The article discusses the importance of sharpening cutting tools for Tactical Air Control Party (TACP) members during survival training, emphasizing techniques and tools used in the field. It highlights the challenges faced in extreme conditions and provides practical advice for maintaining sharpness to ensure safety and effectiveness.
Key points from this article:
The TACP members were undergoing a Combat Survival and Evasion course in freezing conditions, facing hypothermia risks due to delays.
How the ability to sharpen tools effectively impacts survival chances in extreme weather, as demonstrated by the instructor's experience with dull cutting tools during training.
Why understanding sharpening techniques is crucial for military personnel, as it directly affects their operational readiness and safety in survival situations.
Updating summary...
SERE Survival: Basics of sharpening your cutting tools in the field
SOFREP News Team
Speed
1x
Listen
COMMENTS
“Ops are pushed 1 hour, remain on station.” My PRC-152 spit this information out matter-of-factly as wind and freezing rain pelted me and my crew of Tactical Air Control Party (TACP) members on the top of a mountain. These TACP’s were going through a Combat Survival and Evasion course and I was their instructor. They […]
“Ops are pushed 1 hour, remain on station.” My PRC-152 spit this information out matter-of-factly as wind and freezing rain pelted me and my crew of Tactical Air Control Party (TACP) members on the top of a mountain. These TACP’s were going through a Combat Survival and Evasion course and I was their instructor. They were quickly slipping into stage 1 hypothermia on this freezing day in late February. We were delayed one hour on this mountain and I was sure that if I didn’t get a fire going immediately I would be dealing with some cold injuries. It had been a miserable trip thus far; I’d cut down more trees than I ever had in a trip in the last two days to build fires to dry out my crew’s clothing. If I hadn’t had the skills to sharpen my cutting tools it would have been even worse, as my axe and knives were so dull at the end of each day that they couldn’t cut vegetables smoothly due to the amount of use they got.
Advertisement
There are multiple ways to sharpen your cutting tools. Each have their own merits. Of any job in the military I’d argue that Survival, Evasion, Resistance, and Escape instructors likely use their cutting tools in the most extreme manner on a day-to-day basis. Going through training we are constantly assessed on our ability to sharpen our tools to ensure that they have a razors edge at all times. The method we use to sharpen our cutting tools in the field is not the best, nor is it the worst. It has it’s good points and it’s bad. The primary sharpening tool used is the Lansky Puck or variations thereof. The sharpening puck is a simple puck shaped stone with a coarse and a fine side. You start with the coarse side and then move to the fine side to finish the blade off.
Tools of the trade: As a SERE Specialist Candidate we sharpened our Air Force survival knives using a file with no handle. It made sharpening our tools an interesting task to say the least.
The sharpening puck was chosen because of its versatility. It can be used to sharpen both knives and axes equally well. There are other tools that many SERE Specialist use in my career field to specifically sharpen knives (diamond sharpening stones) however they lack the versatility of the sharpening puck. When using the puck to sharpen a knife you start with it in your hand using the “barstool technique” whereby your fingers are all below the edge of the puck to ensure that you do not slice your finger tips off while sharpening your knife. Whet stones / sharpening stones work as they are extremely porous and will collect metal as you grind the blade against them. As these pores become clogged the effectiveness of the whet stone is reduced. To counteract this you can use a sharpening stone oil to lift the metal to the surface. In the survival world we rarely do this and instead rely on water and scrubbing to remove the metal from the pores. The rule of thumb is that if you use oil – stick with it, if you use water – stick with it. No switching back and forth.
To sharpen your knife you need to understand the bevel of the blade. A bevel is a sloping surface. Imagine if you will a triangle. At the tip of the triangle two slopes intersect at an angle relative to each other. Think of that triangle as the two sides of your blade meeting. To sharpen effectively we are aiming to have those intersect evenly (there are cases where you don’t. Again, sticking with the basics for now). There are a couple typical blade angles that we see. Axes typically are around the 30-40 degree mark depending on the type of wood being chopped. Working knives range anywhere from the 20-30 degree range. In the case of the handy US knife used in the SERE school we typically use 22.5 dergrees to make our life simple when teaching basic sharpening techniques.
Advertisement
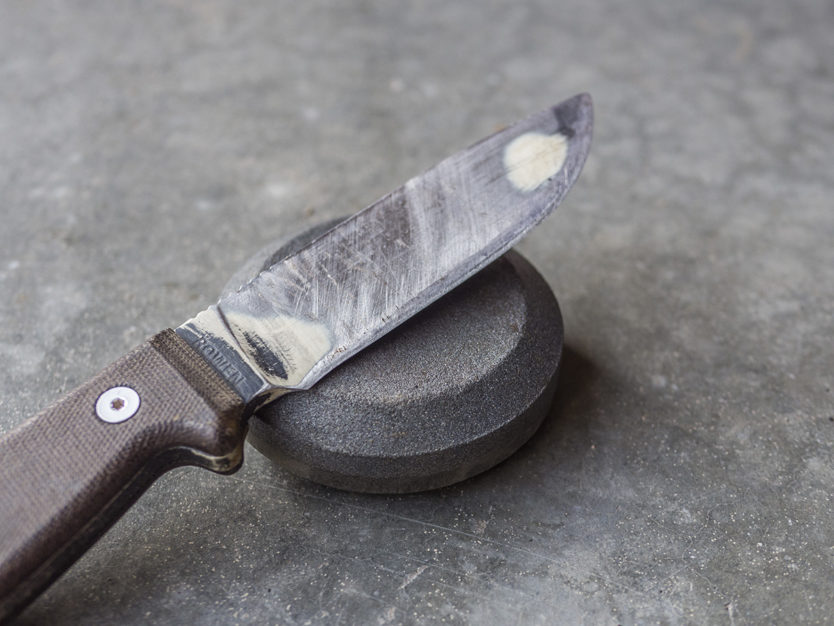
ESEE-4 after my most recent field op instructing students. Knife was used heavily and here I am in the initial stages of sharpening it.
We start with the edge of blade resting vertically against the whet stone surface. This creates a 90 degree angle, if we half that we get a 45 degree angle. Half of that brings us to 22.5 degrees. The blade is then brought across the stone at that angle in order to sharpen it. We must make sure to do an equal amount of strokes on both sides. My typical regimen for a heavily used blade is to start with ten on each side, then go down to nine, then eight and so forth all the way down to one swipe on each side. At which time I flip the puck over to the fine side and continue the same process. If your blade isn’t terribly dull you can simply start on the fine side as well. If you turn the cutting edge of the blade and look down onto it, viewing both sides of the bevel you should see no flat or shiny spots. These are areas where the two bevels are not meeting and where it is flat. This is indicative of a portion of the blade that needs to be sharpened more. There are a variety of methods to test sharpness. In survival I never teach shaving arm hair because of how easy it is to cut yourself. A cut at home is simple to take care of however a cut in the field can quickly become infected. Your knife is sharp enough when it can cut what it needs to cut.
If you have no sharpening devices available to you I typically teach one natural approach. First find yourself a suitable stone. You want a rock that is somewhat porous such as sandstone. Typically stones found along river banks or in rivers work best as they have been worn smooth by currents. However you do not want something with large holes in it. It should resemble a whet stone. Simply repeat the steps as described above on the flattest portion of the rock in order to sharpen it as necessary. It won’t give you the best edge but it is better than nothing.
Advertisement
ESEE-4 after having been sharpened using only stones from a river for a week.
Books have been written on how to sharpen cutting tools. I haven’t even scratched the surface. However this small amount of info should be enough to get you started in the world of sharpening. Realize that sharpening your blade in the field has its own set of challenges. Find a method that works for you and become good at it. I can’t teach you through the internet how to keep your hand steady when drawing the blade across the stone, only practice can do that. Good luck and remember, cut away from yourself, never use your body as a brace while cutting and finally be careful when handing blades off.
“Ops are pushed 1 hour, remain on station.” My PRC-152 spit this information out matter-of-factly as wind and freezing rain pelted me and my crew of Tactical Air Control Party (TACP) members on the top of a mountain. These TACP’s were going through a Combat Survival and Evasion course and I was their instructor. They were quickly slipping into stage 1 hypothermia on this freezing day in late February. We were delayed one hour on this mountain and I was sure that if I didn’t get a fire going immediately I would be dealing with some cold injuries. It had been a miserable trip thus far; I’d cut down more trees than I ever had in a trip in the last two days to build fires to dry out my crew’s clothing. If I hadn’t had the skills to sharpen my cutting tools it would have been even worse, as my axe and knives were so dull at the end of each day that they couldn’t cut vegetables smoothly due to the amount of use they got.
There are multiple ways to sharpen your cutting tools. Each have their own merits. Of any job in the military I’d argue that Survival, Evasion, Resistance, and Escape instructors likely use their cutting tools in the most extreme manner on a day-to-day basis. Going through training we are constantly assessed on our ability to sharpen our tools to ensure that they have a razors edge at all times. The method we use to sharpen our cutting tools in the field is not the best, nor is it the worst. It has it’s good points and it’s bad. The primary sharpening tool used is the Lansky Puck or variations thereof. The sharpening puck is a simple puck shaped stone with a coarse and a fine side. You start with the coarse side and then move to the fine side to finish the blade off.
Tools of the trade: As a SERE Specialist Candidate we sharpened our Air Force survival knives using a file with no handle. It made sharpening our tools an interesting task to say the least.
The sharpening puck was chosen because of its versatility. It can be used to sharpen both knives and axes equally well. There are other tools that many SERE Specialist use in my career field to specifically sharpen knives (diamond sharpening stones) however they lack the versatility of the sharpening puck. When using the puck to sharpen a knife you start with it in your hand using the “barstool technique” whereby your fingers are all below the edge of the puck to ensure that you do not slice your finger tips off while sharpening your knife. Whet stones / sharpening stones work as they are extremely porous and will collect metal as you grind the blade against them. As these pores become clogged the effectiveness of the whet stone is reduced. To counteract this you can use a sharpening stone oil to lift the metal to the surface. In the survival world we rarely do this and instead rely on water and scrubbing to remove the metal from the pores. The rule of thumb is that if you use oil – stick with it, if you use water – stick with it. No switching back and forth.
To sharpen your knife you need to understand the bevel of the blade. A bevel is a sloping surface. Imagine if you will a triangle. At the tip of the triangle two slopes intersect at an angle relative to each other. Think of that triangle as the two sides of your blade meeting. To sharpen effectively we are aiming to have those intersect evenly (there are cases where you don’t. Again, sticking with the basics for now). There are a couple typical blade angles that we see. Axes typically are around the 30-40 degree mark depending on the type of wood being chopped. Working knives range anywhere from the 20-30 degree range. In the case of the handy US knife used in the SERE school we typically use 22.5 dergrees to make our life simple when teaching basic sharpening techniques.
ESEE-4 after my most recent field op instructing students. Knife was used heavily and here I am in the initial stages of sharpening it.
We start with the edge of blade resting vertically against the whet stone surface. This creates a 90 degree angle, if we half that we get a 45 degree angle. Half of that brings us to 22.5 degrees. The blade is then brought across the stone at that angle in order to sharpen it. We must make sure to do an equal amount of strokes on both sides. My typical regimen for a heavily used blade is to start with ten on each side, then go down to nine, then eight and so forth all the way down to one swipe on each side. At which time I flip the puck over to the fine side and continue the same process. If your blade isn’t terribly dull you can simply start on the fine side as well. If you turn the cutting edge of the blade and look down onto it, viewing both sides of the bevel you should see no flat or shiny spots. These are areas where the two bevels are not meeting and where it is flat. This is indicative of a portion of the blade that needs to be sharpened more. There are a variety of methods to test sharpness. In survival I never teach shaving arm hair because of how easy it is to cut yourself. A cut at home is simple to take care of however a cut in the field can quickly become infected. Your knife is sharp enough when it can cut what it needs to cut.
If you have no sharpening devices available to you I typically teach one natural approach. First find yourself a suitable stone. You want a rock that is somewhat porous such as sandstone. Typically stones found along river banks or in rivers work best as they have been worn smooth by currents. However you do not want something with large holes in it. It should resemble a whet stone. Simply repeat the steps as described above on the flattest portion of the rock in order to sharpen it as necessary. It won’t give you the best edge but it is better than nothing.
ESEE-4 after having been sharpened using only stones from a river for a week.
Books have been written on how to sharpen cutting tools. I haven’t even scratched the surface. However this small amount of info should be enough to get you started in the world of sharpening. Realize that sharpening your blade in the field has its own set of challenges. Find a method that works for you and become good at it. I can’t teach you through the internet how to keep your hand steady when drawing the blade across the stone, only practice can do that. Good luck and remember, cut away from yourself, never use your body as a brace while cutting and finally be careful when handing blades off.


COMMENTS