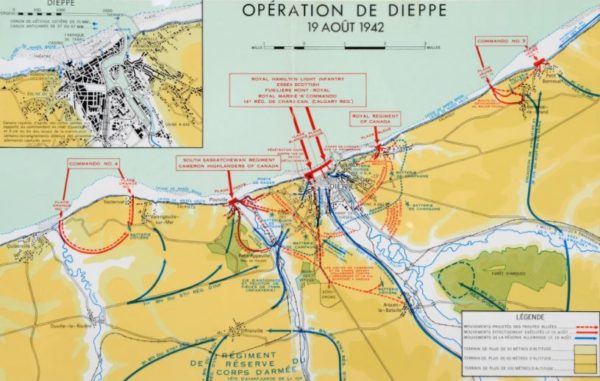
The Essex Scottish men as individuals fought back fiercely, men were using their bodies as bridges over the barbed wire. A small group of 12 men made it to the Esplanade where they hurled grenades into gun positions, and fighting house to house harassed German patrols for over an hour before being forced back to the beach.
White Beach on the right fared equally poorly. The Royal Hamilton Light Infantry was coming under direct fire from 47mm and 37mm anti-tank guns coming ashore. Machine gun and mortar fire raked the beach into a death trap. Nearly all of the officers and senior NCOs were killed or wounded. One small group attacked the Casino and held a small foothold for a short time. Another group coming off the beach tried to storm up a cliff and the entire group was killed on the slope.
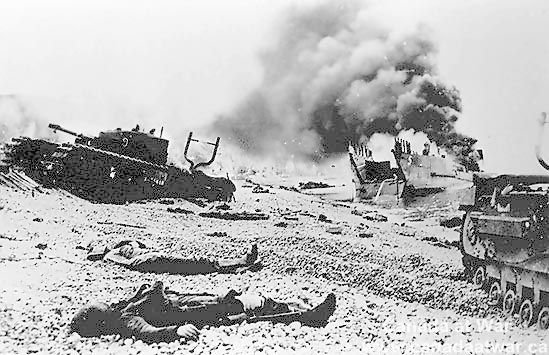
The tank landing craft, so crucial to the success of the operation were battered as soon as they emerged from the smoke screen. The assault groups of Sappers coming off of the tank landing craft were annihilated. One group of 71 had just nine left in less than ten minutes upon hitting the beach and four of them were wounded. Of the total of 314 Royal Engineers, nine officers and 180 men were killed upon landing.

Despite the fire, 17 tanks in the first wave made it to shore. Six reached the Esplanade. One climbed the steps of the Casino and they fired everything they had at the enemy until their ammunition was spent.
Only 28 tanks made it to shore, all of which were destroyed by the Germans. Because of the extremely heavy casualties including the Signalmen and beach groups, the commanders on ship were completely in the dark. At 0600, the commanders committed his reserve blindly, the Fusiliers Mont-Royal right into the center of the beach and they were immediately forced to dig in on the beach to stay alive. Of this group, 288 officers and men were eventually forced to surrender.
The Royal Marines were thrown back into the breach at 0830 but as soon as they came out of the smoke screen, the murderous fire began raking the landing craft. Their commander, Lt. Colonel J.T. Phillips signaled for the craft to turn around.
By 0900 the decision was made to start a withdrawal of the troops. There could be no orderly withdrawal as units had ceased to exist and it became an exercise in grabbing whoever they could off the beaches. At 1022, the destroyers lined up and to follow the rescue ships in as closely as possible firing with everything they had. The fighting on the beaches took another three bloody hours to get the remaining men off the beaches. The raid had been a colossal, bloody failure.
The Canadians had lost 215 officers and 3164 men. Total losses for the raid were 494 officers and 3890 men. Canadian casualty rates were about 68 percent. Of the 1000 Commandos, 247 were lost. All of the vehicles that made it to the beaches were lost. The Royal Navy lost 81 officers and 469 men including a destroyer (HMS Berkeley) and 33 landing craft. The Royal and Canadian Air Forces lost a total of 111 planes shot down. Of the 50 American Rangers, six were killed, four were wounded and six were taken prisoner. German casualties totaled 591 with the Luftwaffe losing just 48 aircraft.
The bloody lessons learned at Dieppe would serve the Allies well when they came ashore in France to stay in 1944. It would provide the Allied planners a blueprint on what was needed to successfully conduct amphibious operations. They included:
- Proper preliminary artillery support, including aerial, naval bombardment;
- Sustained element of surprize;
- Better intelligence concerning enemy fortifications;
- The avoidance of a direct frontal attack on a defended port city; and,
- Better re-embarkation craft
- Specialized Armored vehicles for the engineers to clear the beaches
Another lesson learned was that the Allies learned that taking a port city would render the harbor and piers useless through the action of taking them. Therefore they would construct prefabricated harbors, “Mulberries” that would be towed to the beaches. They wouldn’t make the same mistakes in Normandy.
Photos Courtesy: Wikipedia, the Canadian Forces, Dieppe Raiders Association


COMMENTS