
2) Aiming
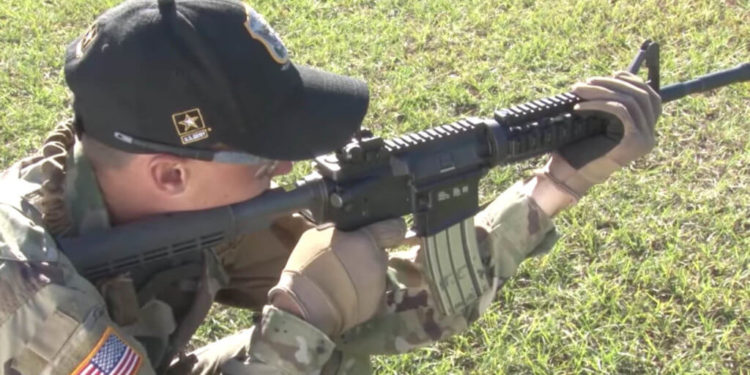
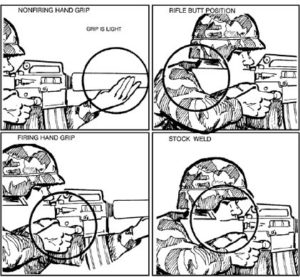
Having mastered the fundamental task of holding the rifle steady, you now must align the rifle with the target in the same way for each firing.
Alignment of the rifle with the target is critical. It involves placing the tip of the front sight post in the center of the rear sight aperture. Any alignment error between the front and rear sights repeats itself for every half meter the bullet travels. For example, at the 25-meter line, any mistake in rifle alignment is multiplied 50 times. If the rifle is misaligned by 0.1 inches, it causes a target at 300 meters to be missed by five feet.

A proper firing position places your eye directly in line with the center of the rear sight. When the eye is focused on the front sight post, the eye’s natural ability to center objects in a circle and seek the center of the aperture aids in providing correct sight alignment. For the average person firing at targets, the eye’s natural ability can accurately align the sights. Therefore, you can place the front sight post’s tip on the aiming point, but the eye must be focused on the front sight post’s tip. This causes the target to appear blurry while the front sight post is seen clearly.

Once you can correctly align your sights, you can obtain a sight picture. A correct sight picture has the target, front sight post, and rear sight aligned.
3) Breath Control
The third fundamental is about your breathing. As your skills improve and as timed or multiple targets are presented, you must learn to control your breath at any part of the breathing cycle. There are generally two types of breath control techniques that most people use. You must be aware of how the rifle’s movement (while sighted on a target) changes due to breathing.
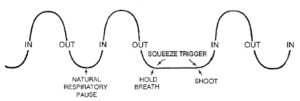
The first technique is used when time is available to fire a shot. According to it, you fire the shot the moment of natural respiratory pause when most of the air has been exhaled from your lungs and before inhaling. Breathing should stop after most of the air has been exhaled during the normal breathing cycle. The shot must be fired before you feel any discomfort.
The second technique is to hold your breath for a moment in order to fire a shot.
4) Trigger Squeeze
The final of the marksmanship fundamentals is about the trigger squeeze. Even a novice firer can learn to place the rifle in a steady position and correctly aim to target if he follows the above three fundamentals. However, if the trigger is not squeezed correctly, the rifle will be misaligned with the target at the moment of firing.
Trigger squeeze is essential for two reasons: First, any sudden finger movement on the trigger can disturb the rifle’s lay and cause the shot to miss the target. Second, the precise instant of firing should be a surprise to you. Otherwise, your natural reflex to compensate for the noise and slight punch in the shoulder can cause you to miss the target if you know the exact instant the rifle will fire. You usually tense your shoulder when you’re expecting a rifle to fire. This isn’t easy to detect since you don’t realize you’re flinching.
Your trigger finger should be placed on the trigger between the first joint and the tip of the finger (not the end). This will also adjust depending on hand size, grip, and so on. The trigger finger must squeeze the trigger to the rear so that the hammer falls without disturbing the rifle’s lay. It isn’t easy to see what effect trigger pull has on the lay of the rifle. Thus, it is important to experiment with many finger positions to ensure the hammer is falling with little disturbance to the aiming process.
Hopefully, this article helped you out some or maybe refreshed your knowledge. With ammo prices seemingly on the rise, consider applying these four fundamentals while dry firing and have a buddy watch you. When coaching, I almost always watch the shooter exclusively, then see where the bullets hit the target later.
This article was originally published in February 2021. It has been edited for republication.


COMMENTS