The last thing you ever want to do in life is to allow others to tell you where you are and where you are going. That kind of foolish blind trust can get you killed or lost at home and abroad. For the adventurer, you’re going to get stuck in situation after situation where people are not going to tell you where you are or where you are going for a multitude of reasons from a language barrier to trust. That’s fine, and you should not trust them either – trust no one but yourself.
Welcome to part IV of the mercenary series, read parts I, II, and III to catch up on this burning train-wreck.
I’ve previously covered some packing techniques in part three of this series –welcome to part four. As for the particulars of navigation a few common sense items and study should make sure that you get home.
Brush-up, map reading, and land navigation are perishable skills. Take some time and review what you know and what they are using: Latitude and Longitude, MGRS, Topographical Maps, Friendly and Location Specific Civilian and Military Map Graphics, Scale and Distance, and Star Charts for where you’re going.
Area and regional maps – print or draw to fit the occasion
Lensatic compass – military grade
Star chart and/or Sky Map App
Handheld GPS
Use this type or a similar Lensatic Compass – Image courtesy of U.S. Army, FM 3-25.26, Map Reading and Land Navigation
Using a handled GPS or phone App brings compromisable discovery risk – use wisely and as previously discussed in the series.
Orient Yourself to the Map
Your map is not a sentient being, and it is not going to tell you that you’re going the wrong way. That is up to you – using your tools, the compass, and the map. To know where one is going, one must know where one is.
Find yourself on the map; that is point A.
Find where you’re going, that is point B.
Either draw a straight line between these two points or do so in your head.
Identify yourself at point A, your known location and any visible landmarks and the known direction of travel on the way to point B.
Now, rotate your map and not yourself in correspondence to the line. Your map will most like be canted – that’s fine.
You are now oriented to your map. If you’re clever, it’s close, and you have plenty of daylight, and you can identify enough terrain features; you could travel to your destination without screwing around. If not, get out your compass.
Don’t be a Microwave, Fix your Compass
Having a compass and using a compass are two different things. I’ve watched seasoned folks in uniform and others while on adventure look at a compass as if it’s an infallible piece of advanced hardware – it’s not. For starters, do not use your compasses while on top of or while in a vehicle, metal tower, any other larger metal object, field guns, munition stocks, near electrical current, by a generator, under powerlines, or while on top of a metallurgic mineral deposit. Metal, electricity, and environmental factors will give you a false compass reading.
Things on you or around your compass will also affect its reading: belt-buckle, cell-phone, computer, desk, keys, knife, weapon, or even standing by a fence – just keep it away from metal while trying not to get lost.
Holding a Compass – straight from U.S. Army, FM 3-25.26, Map Reading and Land Navigation
Magnetic azimuths are determined with the use of magnetic instruments, such as lensatic and M2 compasses. The techniques employed when using the lensatic compass are as follows:
Using the Centerhold Technique.First, open the compass to its fullest so that the cover forms a straight edge with the base. Move the lens (rear sight) to the rearmost position, allowing the dial to float freely. Next, place your thumb through the thumb loop, form a steady base with your third and fourth fingers, and extend your index finger along the side of the compass. Place the thumb of the other hand between the lens (rear sight) and the bezel ring; extend the index finger along the remaining side of the compass, and the remaining fingers around the fingers of the other hand. Pull your elbows firmly into your sides; this will place the compass between your chin and your belt. To measure an azimuth, simply turn your entire body toward the object, pointing the compass cover directly at the object. Once you are pointing at the object, look down and read the azimuth from beneath the fixed black index line. This preferred method offers the following advantages over the sighting technique:
(1) It is faster and easier to use.
(2) It can be used under all conditions of visibility.
(3) It can be used when navigating over any type of terrain.
(4) It can be used without putting down the rifle; however, the rifle must be slung well back over either shoulder.
(5) It can be used without removing eyeglasses.
Centerhold technique.
Using the Compass-to-Cheek Technique.Fold the cover of the compass containing the sighting wire to a vertical position; then fold the rear sight slightly forward. Look through the rear-sight slot and align the front-sight hairline with the desired object in the distance. Then glance down at the dial through the eye lens to read the azimuth.
NOTE:
The compass-to-cheek technique is used almost exclusively for sighting, and it is the best technique for this purpose.
Compass-to-cheek technique.
Presetting a Compass and Following an Azimuth.Although different models of the lensatic compass vary somewhat in the details of their use, the principles are the same.
(1) During daylight hours or with a light source:
(a) Hold the compass level in the palm of the hand.
(b) Rotate it until the desired azimuth falls under the fixed black index line (for example, 320°), maintaining the azimuth as prescribed.
-End FM 3-25.26 excerpt
No Auto-Updates for You Compass
The next thing you should know is that your compass does not auto-update. As you travel within the nation or abroad the magnetic declination variance chamges, and you will need to identify: True North, Grid North, and Magnetic North at your present location.
Magnetic declination is the direction and amount of variation between the Magnetic Pole and True North. The amount and direction of declination depends upon how those two poles align relative to a given point on Earth. When the two poles align, declination is zero, and the line of zero declination is termed the agonic line. At points west of the agonic line, a magnetic needle will point east of true north (positive declination). At points east of the agonic line, a magnetic needle will point west of true north (negative declination). There is a pattern, but it does not follow meridians or parallels. Isogonic lines are like magnetic contour lines – they trace a path of constant magnetic declination. – USGS
To obtain the magnetic declination, you can check most military maps, google it or identify the number of degrees between true north and magnetic north and adjust your compass accordingly. The third method is the most trustworthy because declination varies over time. The rule of thumb is not to use magnetic variance data that is over 15 years old. Once you determine your variance, find that little thing on the back of your compass that looks like a flathead screwdriver will fit into – that is where you adjust or dial in your compass for magnetic declination variances on your compass.
If magnetic north is east of true north, the local declination is positive.
If magnetic north is west of true north, the local declination is negative.
On your map, draw a line from your starting point to your destination to determine your, map bearing. Now extend that line through the map border to create your, neat line.
Place your compass on your map – directly over the intersection of the lines that you just drew.
Adjust the bezel ring so that the luminous line on your compass is set to map north, and identify your map bearing from the compass bezel ring. Your bearing must agree with your direction of travel – if you’re heading east, your bearing should read 90 degrees, not 270 degrees.
In your head, some light math: If the declination is positive, subtract the declination amount from the bearing you’ve just obtained. If it’s negative, add the declination amount to the bearing.
Adjust the variance that you’ve calculated on the back of your compass and make it permanent for this area. Do not rely on the bezel ring on the front of your compass to maintain the offset, that is a lazy and stupid method to rely on. You’re going to bump it, and if you’re using waypoints to navigate you will need that bezel ring freed up to mark the degrees of travel from waypoint to waypoint – especially if you’re moving in rough terrain, at night, or if you’re tired.
Now lift your compass for navigation.
Sight your next waypoint or a landmark, and repeat this until you have reached your destination.
GPS it – In a Cinch, or Just Plain Boredom – Maybe.
You can adjust the magnetic declination of your compass with your GPS, but take those things with a grain of salt – GPS devices are as untrustworthy as the savages that you’ve allowed yourself to mingle amongst.
Let’s pretend we live in a world where GPS devices won’t compromise your position and accurately provide your location at all times. For this exercise, we will set the magnetic declination at 10 degrees east of true north, and your destination is directly at true north of your present location.
In your GPS menu, set it to true north. Your GPS will now indicate a bearing of zero degrees, which is what you’ll follow to your destination.
Adjust your compass declination so that magnetic arrow points 10 degrees east and adjust the luminous line to zero degrees on your compass bezel ring.
Now, with the GPS directional arrow pointing directly away from you, rotate yourself and the compass in one uniform motion until the orientating arrow and magnetic needle are overlapping.
Identify a landmark, or waypoint to travel toward in the identified true north, and best of luck to you.
Keep Your Pace
First, your need to know your pace count, and use meters. Most maps and militaries use the metric system –feet and miles will get you lost. Now measure out 100 meters on a flat piece of terrain, and walk the line. Start with your feet together and step-off counting with your left foot, and count every time your left foot strikes the ground – including your first step and walk as if you normally would, dummy. Repeat this process two more times, total those numbers and divide by three. That is your pace count, and you now know how many left steps equal out to around 100 meters. This will help guide you as you travel, and of course, you’ll have to provide yourself with a margin of error across rough terrain and other movement complications like dysentery or carrying too much junk.
You can buy a fancy pace counter, to keep track . . . Or just make one, like a real mercenary. I’ve yet to meet anyone rich running amuck in the terrible areas – everyone is balling on a budget with the worse and cheapest. Rich kids don’t like to play in the dirt or not get to do what they want, and when they want to.
550 Cord Pace Counter
Best of the Ranger Digest Soldiers Tips and Tricks.
It’s Over Yonder – Using Your Hands and Eyes
Bottom line up-front, your eyes are not laser range finders, but you will get better with practice and knowing your eyes and the many factors that will play with the ability to judge the distance to a target. Things like weather, elevation, terrain, color, sun position, size and so on will put a spell on you. See past the optical illusions, and relax your eyes brah.
Give’em the finger, and assume that the distance between your eyes and your finger is an even proportionate ratio of 1:10, and for the sake of the angle of your finger which is acting as a parallax, it’s at 6°.
You’re going to be judging the lateral shift of an unknown target, the estimated relation of size to distance. Extend your arm and align your upright finger to cover the target A, measure with one eye at a time; our left eye is A’, now switch to your right eye which is B’ without adjusting your finger even though the object will appear to have moved, what your finger is now in front of and covering, is B to measure the target. Estimate the target distance AB size in meters by judging in comparison the size to other objects such as telephone poles, buses, and etcetera. The distance to the target is 10 times AB.
Remember science class in grade school and the horizontal parallax method for judging planetary distance in astronomy was discussed. Such as when Mercury or Venus is in transit across the Sun. Or in a more lame setting . . . Trigonometry.
Find your target, make a place for it in your mind palace . . . You know that a T-62 tank is about at 3 meters tall, this is A, mark the building at 15 meters tall and as point B on the target estimate. Your measurement is now known as 10xAB. Say what? Nah, it’s cool – check it out AB is a line segment, from point A to point B. Point A to point B is 15, so 10 x 12 = 1,200 meters.
The next and most obvious method is the known distance methods – If you already know the distance of an object, that is your key range, and can be used to identify another nearby object.
A few easy ways to work this out is to estimate the maximum and the minimum distance to the target and use the median. For instance, the maximum is 1000 meters, and the minimum is 800 meters; your range is 900 meters.
You can also halfway your distance, via an estimated point. The fence is 100 meters away, and hallway to a tank; the tank is 200 meters away –run away, we only have AKs!
Football-field it, even though it uses yards instead of meters –most of us are familiar with the spatial 100-yard reference point of a football-field. Estimate the number of football-fields in-between you and your target, and multiply by 100 to get your range. A factory is 5 football-fields away, 5 x 100 = 500 meters to the target – expect variance as the distance increases.
Flash-to-Bang, my favorite game at the bar or in the field – the principle is the same in either place as is the level of nudity, but we will go with the field method in this article/posting/rant. You are going to determine distance by counting the seconds between seeing the flash of a gun or explosion and hearing the sound – light travels faster than sound, Einstein. When you see the flash start counting seconds until you hear the boom – knowing the sound travels at 330 meters per second. For example, the bang took 5 seconds, 5 x 330 = 1650 meters to the target. What can I say, when you’re long, you can be quick –Giggity.
And I Become the Night -The Passionately, Passionate Nightman
Most of this stuff only works well during the day or with good illumination. Dayman, fighter of the Nightman, champion of the sun – isn’t always there for you. So look to the heavens for advice, figuratively.
Determining direction by the North Star and Southern Cross. – Image courtesy of U.S. Army, FM 3-25.26, Map Reading and Land Navigation.
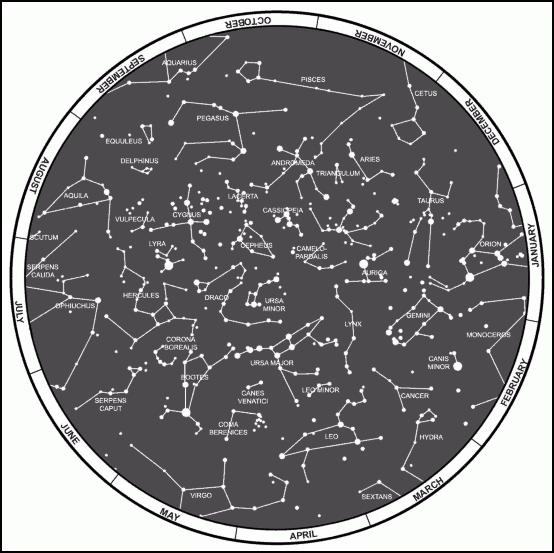
The stars can be your ally on a clear night. Try to keep an eye on the sky, the sun always rises in the East and sets in the West – know where the sun set and mark it in your mind palace with terrain features. You can also activate your sky map app to locate your relative position to the stars as the last resort.
The sky will travel, but one star stays constant; the North Star, also known as the Polar Star or Polaris. The North Star maintains a position of 1° off true north, and does so because the axis of the earth is pointed directly at the North Star. It is also a relatively easy star to find, as it holds its place as the last star in the handle of the Little Dipper. If you can’t find the Little Dipper, then scan the skies for the Big Dipper and as seen in the image above, and use the upper right portion of the ladle of the Big Dipper as a pointer to the Little Dipper, and the North Star.
Constellations, Northern Hemisphere.- Image courtesy of U.S. Army, FM 3-25.26, Map Reading and Land Navigation.
Although, this only works in the Northern Hemisphere, if you’re south of the equator, your shit of luck – unless you can find the Southern Cross and to find it, you’ll just need to reverse the directions to the North Star. Think of it as the Anti-North Star.
Constellations, southern Hemisphere – Image courtesy of U.S. Army, FM 3-25.26, Map Reading and Land Navigation.
Although you can select and constellation to guide you, just keep up with steady azimuth checks on your compass. The rule of thumb for Northern Hemisphere checks is once every half hour and every fifteen minutes for constellations in the Southern Hemisphere. As the night passes, you’ll lose a constellation or two to the horizon, and that’s fine, just pick a new one and keep moving.
Stuck in the Middle with You
If you’re on the road and don’t know what’s next and you have windows start memorizing the landmarks and position of the sun as you travel. You should be alert for this; you’re in a vehicle with strange people in a strange land. If they aren’t out to screw you, someone else may be or someone may be targeting them – damn you, stay awake and watchful. You’re not on a road trip.
If you’re in a covered transport, your ears and ass are your best assets, listen and feel for changes in the road and count turns and their direction. Listen for traffic patterns, water flow, construction work, factory, farm, market or other identifying noises, and know the time of day. Try to log the times and turns you passed these things.
If all else fails, turn on the tracks option via your GPS or Google Maps app.
Knowing where you are can and will save your ass, by allowing you to plan contingencies. Always have a plan for everything.
I’ll stay a coin-flip away from bat-shit crazy, until next time.
As someone who’s seen what happens when the truth is distorted, I know how unfair it feels when those who’ve sacrificed the most lose their voice. At SOFREP, our veteran journalists, who once fought for freedom, now fight to bring you unfiltered, real-world intel. But without your support, we risk losing this vital source of truth. By subscribing, you’re not just leveling the playing field—you’re standing with those who’ve already given so much, ensuring they continue to serve by delivering stories that matter. Every subscription means we can hire more veterans and keep their hard-earned knowledge in the fight. Don’t let their voices be silenced. Please consider subscribing now.
One team, one fight,
Brandon Webb former Navy SEAL, Bestselling Author and Editor-in-Chief
Barrett is the world leader in long-range, large-caliber, precision rifle design and manufacturing. Barrett products are used by civilians, sport shooters, law enforcement agencies, the United States military, and more than 75 State Department-approved countries around the world.
PO Box 1077 MURFREESBORO, Tennessee 37133 United States
Scrubba Wash Bag
Our ultra-portable washing machine makes your journey easier. This convenient, pocket-sized travel companion allows you to travel lighter while helping you save money, time and water.
Our roots in shooting sports started off back in 1996 with our founder and CEO, Josh Ungier. His love of airguns took hold of our company from day one and we became the first e-commerce retailer dedicated to airguns, optics, ammo, and accessories. Over the next 25 years, customers turned to us for our unmatched product selection, great advice, education, and continued support of the sport and airgun industry.


COMMENTS
There are on this article.
You must become a subscriber or login to view or post comments on this article.